Here are 25 cool things to do on Microsoft Paint you probably didn’t know you can do.
You might think that MS Paint or Microsoft Paint is a useless application today. But if you know some advanced tips and tricks about MS Paint, we can assure you that it can become a very useful image editing and drawing app.
Yes, Microsoft has killed the MS Paint app on Windows 10. Still, if you want to use this nostalgic app, you can manually install it.
Now, if your PC already has this app installed, here are some advanced and useful tips and tricks you can try on Microsoft Paint.
So, let’s see what those are…
25 Cool Things to Do On Microsoft Paint
#1 Create a Gradient Color Effect
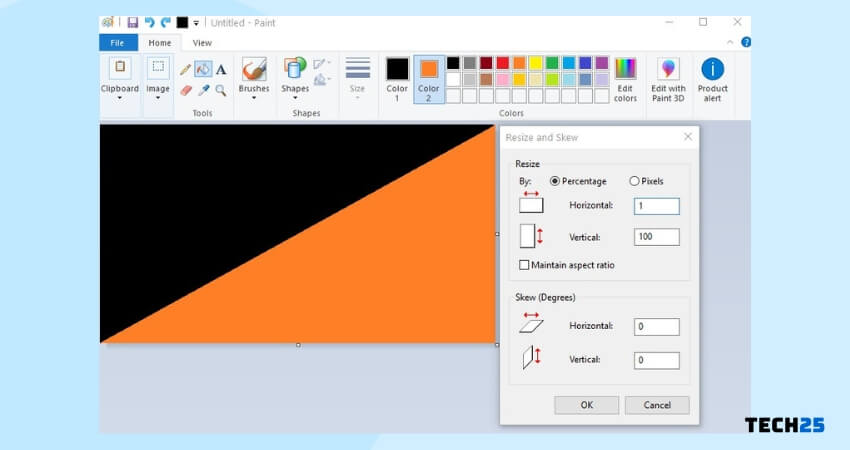
Here’s how to create a gradient color effect on Microsoft Paint.
- Launch MS Paint on your PC
- Now, draw a diagonal line in the middle of the image with the help of the straight-line shape from the toolbar
- Now, use the ‘Fill Color’ tool from the top menu to fill 1 side of the diagonal with your preferred color
- Next, you can fill the other side of the diagonal with another color or you can keep the white color as well
- Now, click on the ‘Resize’ option from the top bar, a new popup window will appear
- Then replace the horizontal below on the ‘Resize’ tab with 1. And, uncheck the ‘Maintain aspect ratio’ option from there. Next, click on the OK button
- Now, you can repeat the previous step as much as you want but replace the horizontal value to 500. Of course, uncheck the ‘Maintain aspect ratio’ option every time
- And you will find your gradient effect
#2 Tweak the Size of the Brush
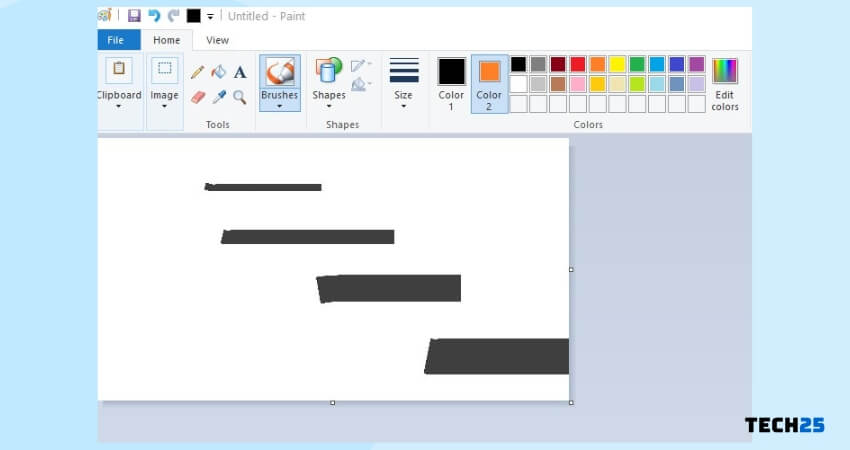
You can edit any images in MS Paint using the brushes. To do that, you will need to click on the ‘Brushes’ icon from the top menu bar. In doing so, a number of different brushes will appear. And you can select any brush from the list.
Now, you will have to draw on the image with your mouse to use the brushes. You can also change the size of the brushes. To do that, just click on the ‘Size’ icon from the top bar and select your preferred brush size from there.
Additionally, you can tweak the brush size with a keyboard shortcut as well. To increase the brush size, press and hold the ‘CTRL’ key and press the ‘Plus’ key on the Numpad on your keyboard. Alternatively, you can decrease the brush size by pressing and holding the ‘CTRL’ key and the ‘Minus’ key on the Numpad of your keyboard.
#3 Undo/Redo
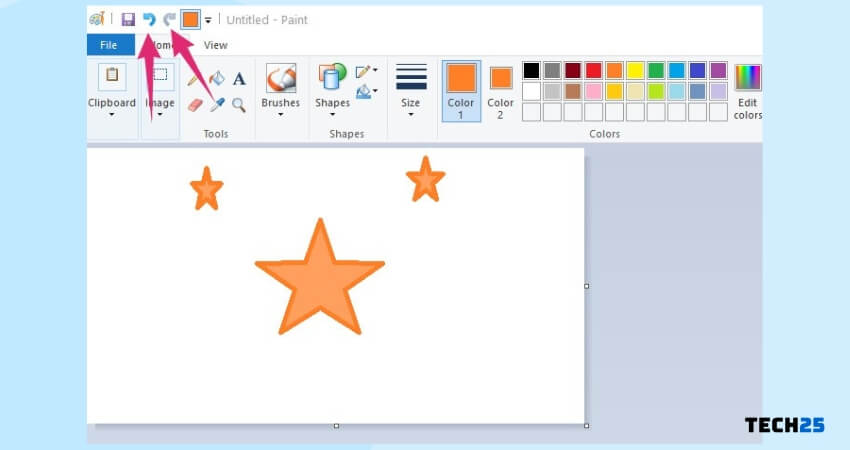
A lot of users might not know that MS Paint comes with the Undo and Redo function. That means you can go to the last steps if you mess up while editing images with MS Paint. Whenever you need to undo, simply press the ‘CTRL+Z’ keys on your keyboard.
And, to redo, simply press the ‘CTRL+Y’ keyboard shortcuts. Additionally, you can also click on the Undo/Redo buttons (looks like curved arrows) from the top menu bar as well for the same results.
#4 Create Custom Brushes
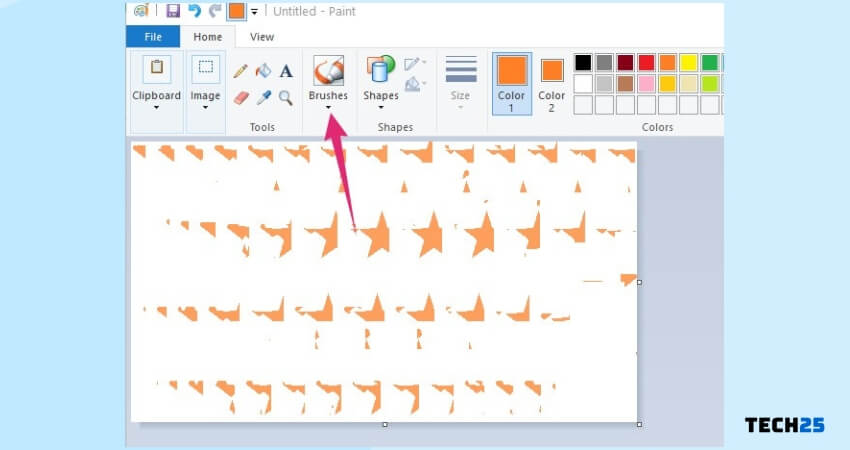
You can use any shapes you have drawn with the ‘Brushes’ tools as custom brush size. Here’s how…
- Use any brush of your choice from the ‘Brushes’ menu and draw your custom brush’s shape
- Now, select this shape using the selection tool. However, make sure, you have enabled the ‘Transparent Selection’ option from there at first
- Next, press and hold the ‘Shift’ button while selecting the new customized shape with your mouse. As a result, this new brush will be used to draw at the moment
#5 Transparent Background Selection
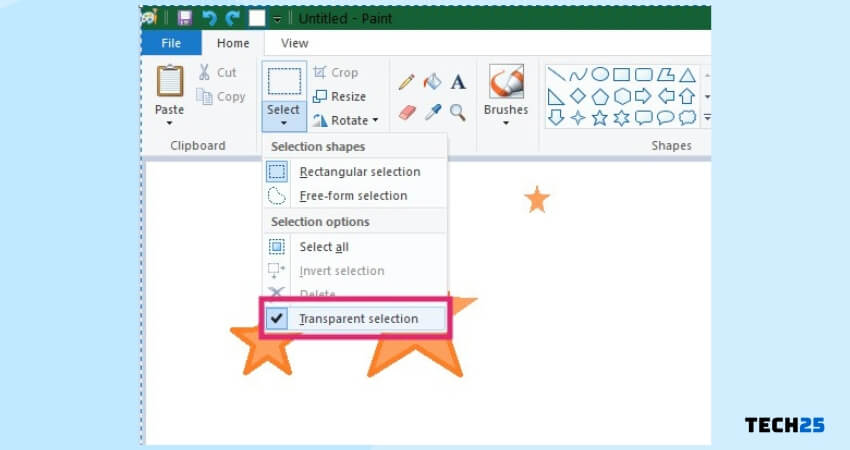
You can actually select a part of an image with a transparent background in MS Paint. Here’s how…
- While selecting a part of the image, click on the ‘downward’ arrow icon from the ‘Select’ option from the top
- Then enable the ‘Transparent Selection’ option from the dropdown menu
- Now, go and select any part of the image, and it will select the image without the background
- You can copy and paste this new selection to any other images using MS Paint as well
#6 Invert Colors
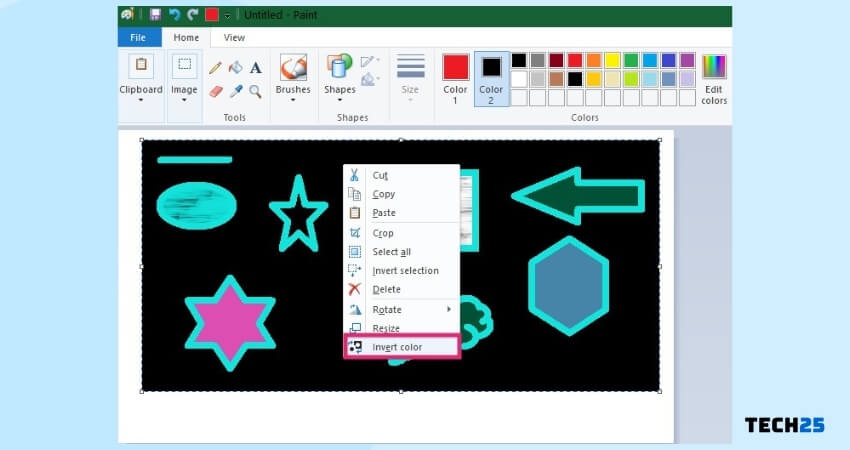
It is very easy to invert colors on Microsoft Paint. Here’s how…
- Select any part of the image you want to invert the color of. And, right-click on the selection and click on the ‘Invert Color’ option
#7 Eraser can be used as a Color Replacement Tool
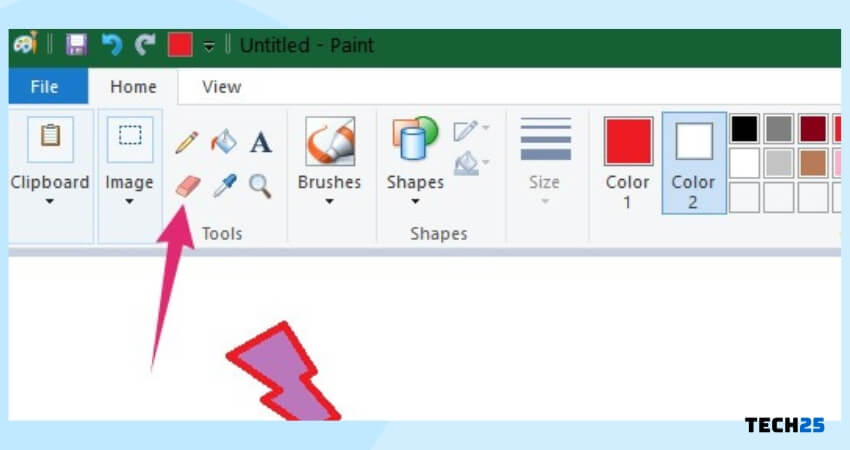
Here are the steps:
- First, select the color you want to replace in the color no. 1
- Next, pick the color you need to replace with in the color no.2
- Then, click on the ‘Eraser’ tool. Now, press and hold the right-click button and drag it over the image
- That way, the color will be replaced by the eraser tool
#8 Trace a Pic in MS Paint
The steps to follow:
- After opening the image you want to trace, pick the black color on the color swatch
- And, now outline the picture as you like
- After outlining, press the ‘CTRL+A’ shortcut on your keyboard and select ‘Invert Color’ by right-cling on the image
- Next, navigate to ‘File>Properties>Black and White’ and click ‘OK’
- Again, press the ‘CTRL+A’ shortcut on your keyboard and select ‘Invert Color’ by right-cling on the image
- Finally, you can use the ‘Eraser’ tool to clean up the messy parts of the image
#9 Set Desktop Background with MS Paint
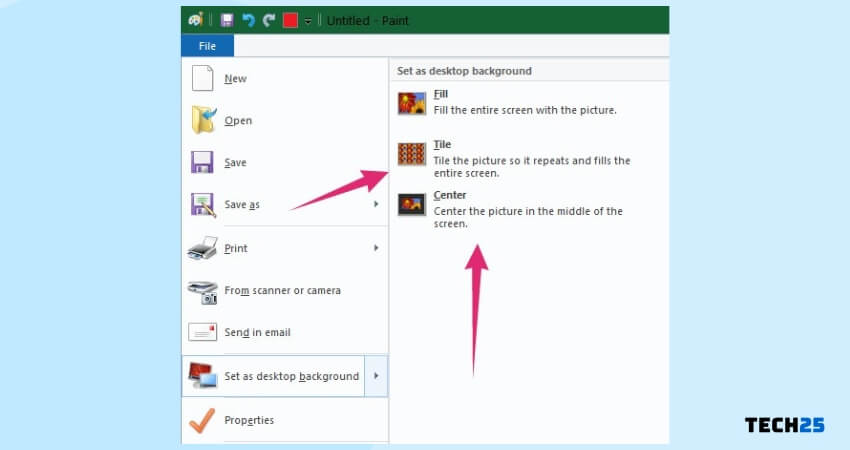
You can set any image as your PC’s wallpaper that you are editing directly from MS Paint. Here’s how…
- Open any image on MS Paint
- Now click on the ‘File’ option from the top bar
- Then, click on the ‘Set as Desktop Background’ option from the dropdown menu
- Additionally, if you hover your mouse cursor over this option, it will give you 3 options to set the desktop background such as Fill, Tile, and Center
#10 Convert Images
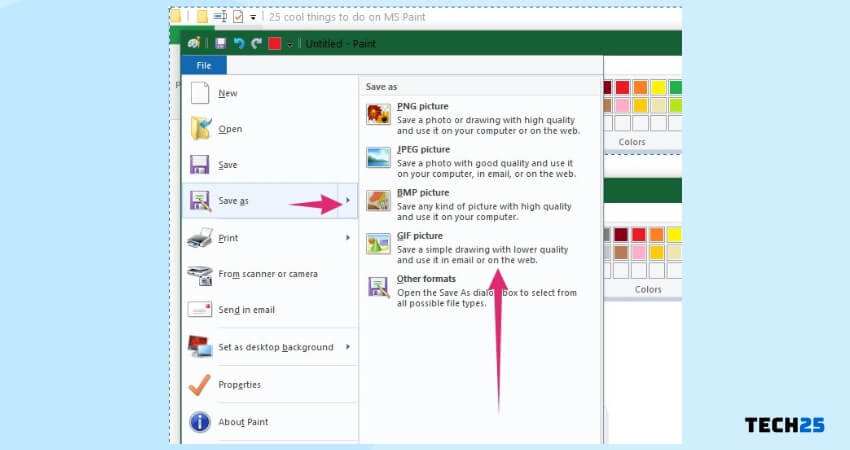
You can actually convert images to various formats using MS Paint. Here are the steps…
- Open an image in MS Paint that you want to convert
- Now, click on the ‘File’ option from the top bar
- Then, hover your mouse cursor over the ‘Save as’ option and you will see 5 options including various image formats
- You can select any of the preferred formats from the option to save and convert the image
#11 Resize Images
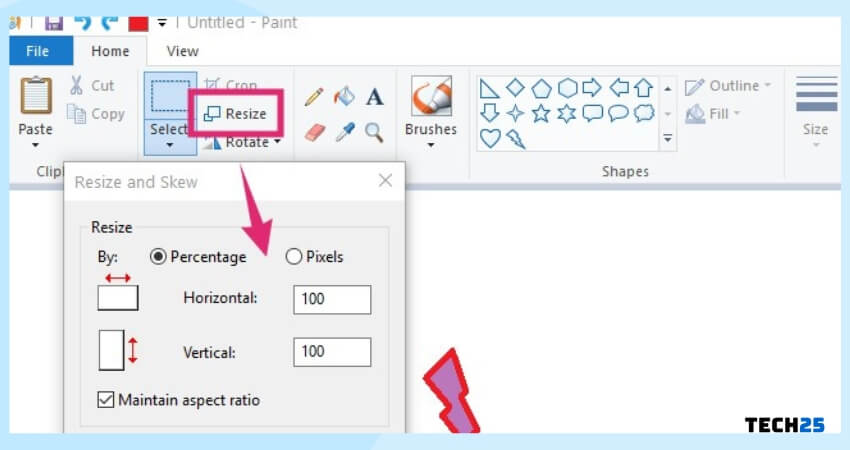
Steps to Follow:
- Open the image you want to resize on MS Paint
- Now, click on the ‘Resize’ option from the top menu bar
- A new popup window will appear. In there, you can resize the image by either percentage or pixel. You can also enable or disable the maintaining aspect ratio option as well
#12 Skew Images
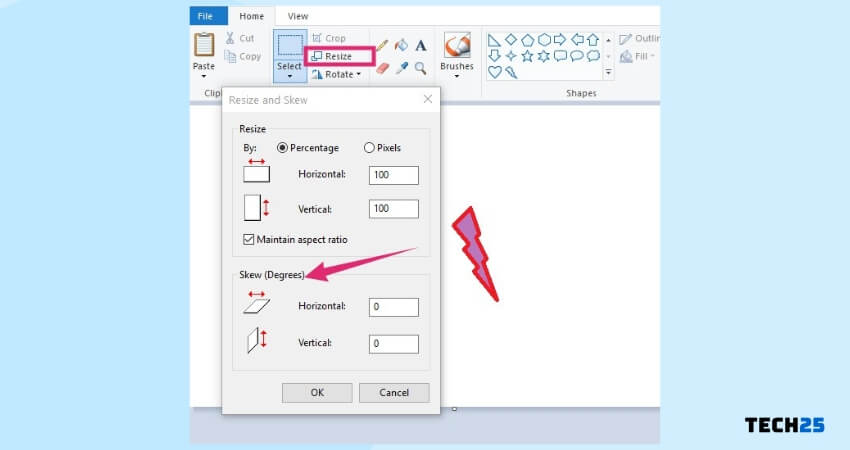
Similar to the last tip, you can also skew any images using MS Paint. To do this, you will have to use the ‘Resize’ option just like we have mentioned in the steps above. When the ‘Resize and Skew’ popup window appears, you have to enter the horizontal and vertical values under the ‘Skew (Degrees)’ tab. Finally, click on ‘OK’.
#13 Rotate or Flip Images
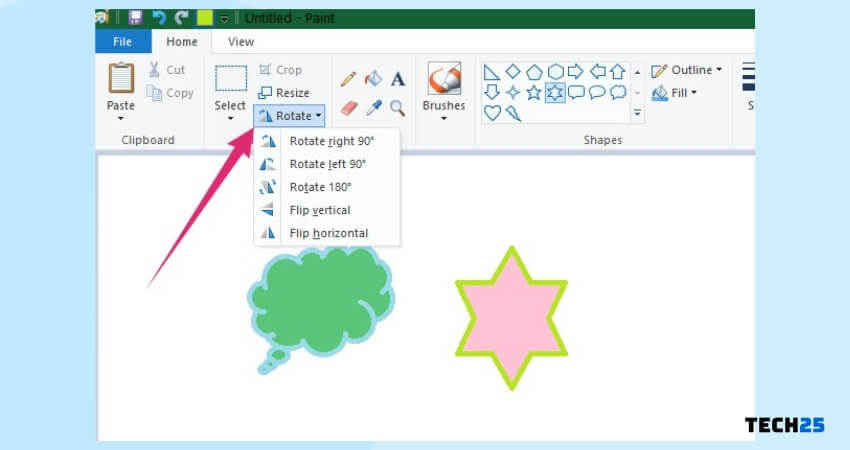
After opening any images on MS Paint, simply click on the ‘Rotate’ button from the top status bar. In doing so, a few options will appear regarding rotating or flipping the image. Select any of them according to your need to rotate or flip the image.
#14 Crop Images with MS Paint
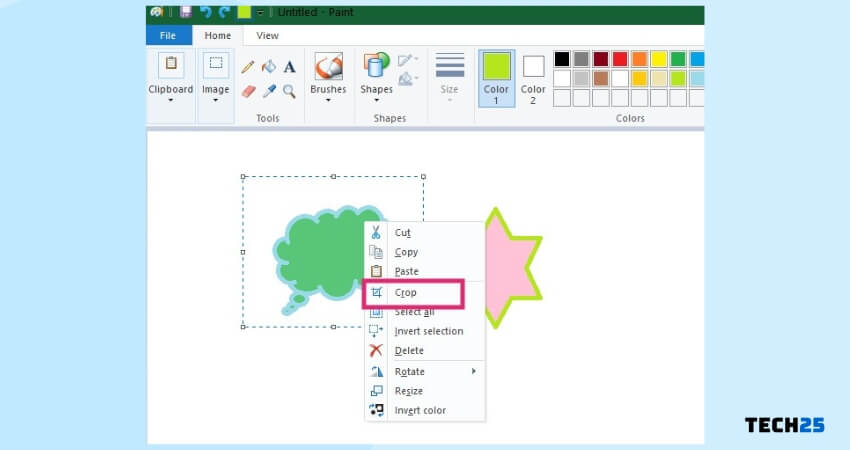
You can actually crop any image with Microsoft Paint. Here’s how…
- Open the image you want to crop on MS Paint
- Now, select the part of the image you want to keep after cropping using the ‘Select’ option. You can also select various types of selection tool from the option
- After you have selected the part of the image, right-click on the image and select ‘Crop’ option
- That’s it. The image will be cropped
#15 Bring out the Rulers and Gridlines
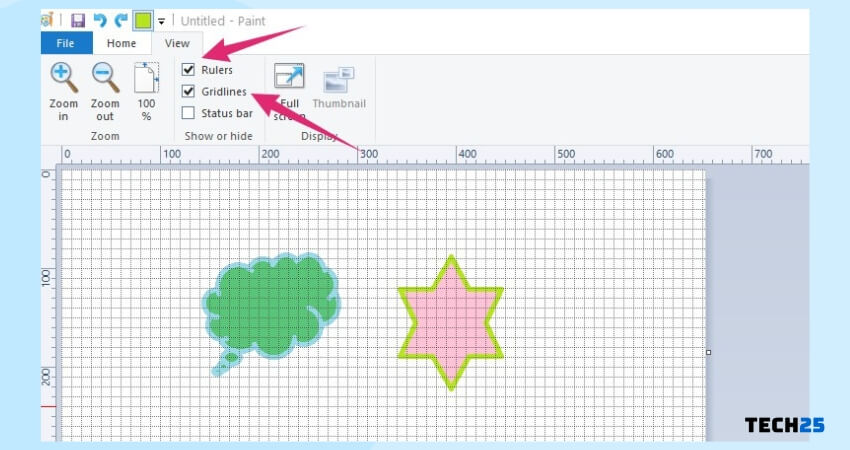
Most advanced photo editing apps will come with grids and rulers. These tools can help you edit your images accurately and fast. Interestingly, MS Paint also has these options. However, these are not enabled by default. So, here’s how to enable the rulers and gridlines.
- Click on the ‘View’ option from the top menu bar
- Next, put a checkmark next to the ‘Rulers’ and ‘Gridlines’ options
- You can disable them by reversing the process above as well
#16 Blur any Part of the Image with MS Paint
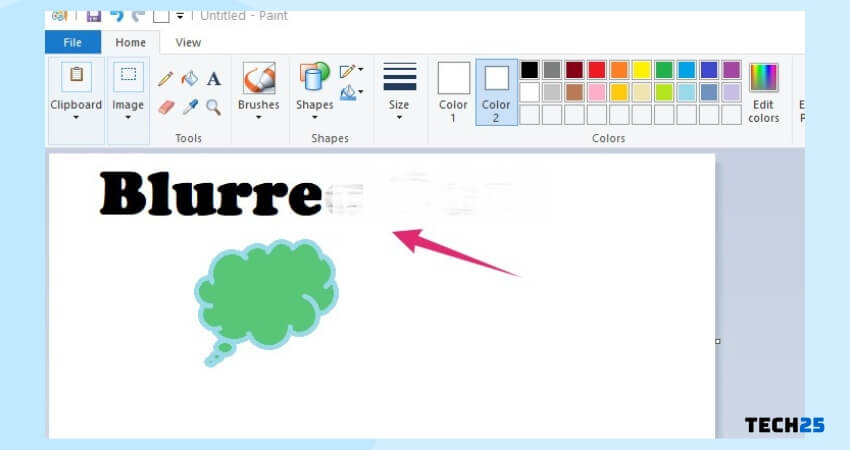
MS Paint doesn’t have any ‘Blur’ tool. However, there is a way to blur any part of the image in MS Paint. Here are the steps to follow.
- Select the ‘Rectangle’ shape from the ‘Shapes’ tab
- Now, select any color you want to in the Color 2 box. For blurring effect black or white works best
- Next, click on the ‘Outline’ icon from the top and select ‘No Outline’
- Then click on the ‘Fill’ icon and select ‘Solid Color’
- Now, you can select the area from the image you want to blur using your mouse cursor. And, it will be blurred from the image
#17 Take and Edit Screenshot Using MS Paint
Steps to Follow:
- Press the ‘CTRL+Print Screen’ keys on the keyboard simultaneously. In doing so, it will take a screenshot of the current screen and windows opened in your PC
- Now, open the MS Paint application and press the ‘CTRL+V’ shortcut. Momentarily, the screenshot you have taken a while back will be pasted in the MS Paint
- So, you can now edit or save it from there
#18 Draw Different Shapes
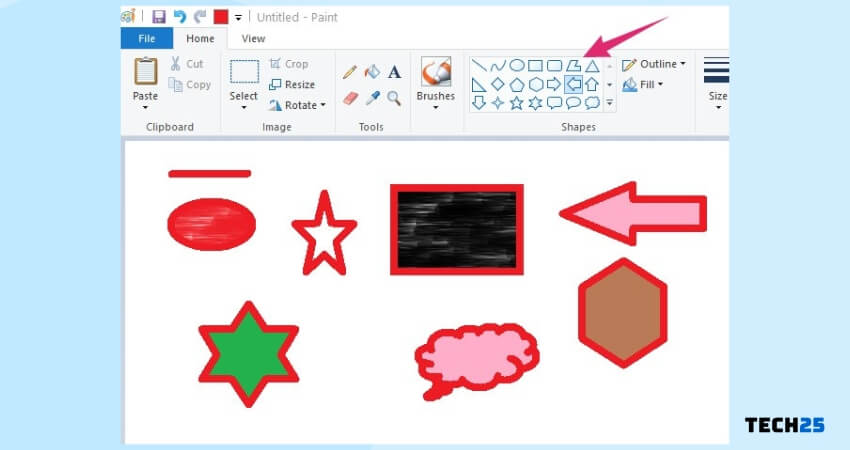
A lot of people don’t take advantage of the default shapes on MS Paint. With the help of those pre-defined shapes, you can actually create very nice drawings. To access any shapes, you have to click on your preferred shape from the ‘Shapes’ box.
There are various shapes like line, rectangle, lightning, star, oval, and more in there. After selecting you can draw them by dragging your mouse cursor into the image. You can also add an outline and fill color to the shapes as well.
#19 Print with MS Paint
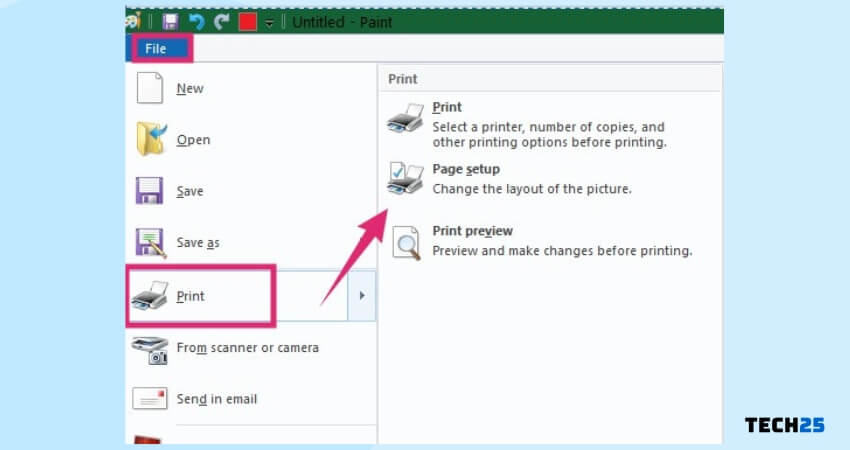
If you have made a nice drawing or you have edited an important image that you want a print version of it, you can easily print out directly from the MS Paint program. Simply, navigate to the ‘File>Print’ option. In there, you will get 3 different options.
- Print: The first option is Print. By selecting it, you will be able to print the image to your preferred printer. You can also tweak a few settings like select the number of copies, orientation, and page range, etc. in there
- Page Setup: With this option, you will be able to customize more print options and settings
- Print Preview: You can preview the image before printing whether it is OK or not
#20 Create PDF Files from MS Paint
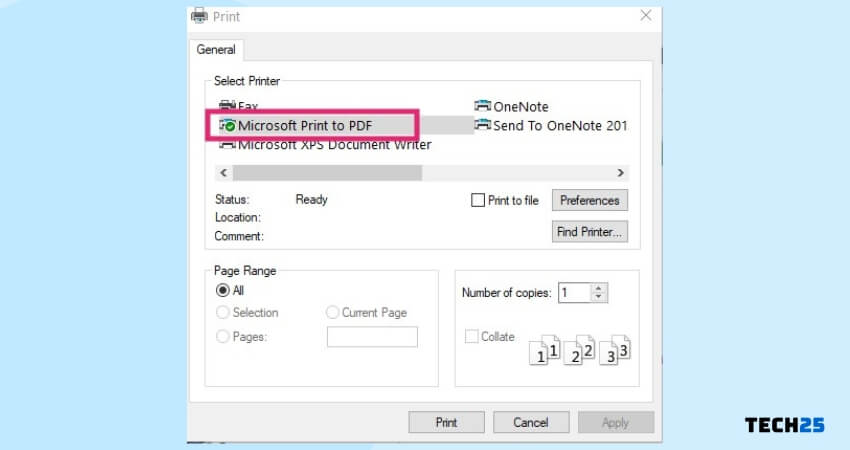
Did you know that you can actually create PDF files of an image using the MS Paint application? Interestingly, it is very easy to do. And, here are the steps you should follow…
- After you have edited an image or drawn an image, navigate to ‘File>Print’ option from the top bar
- Then select the ‘Print’ option from the options that will appear on the right
- Next, a popup window will appear. Choose the ‘Microsoft Print to PDF’ option from under the ‘Select Printer’ tab
- You can also customize a few settings of your PDF page in there like page range, orientation, and the number of copies, etc.
- Finally, click on the ‘Print’ option from the bottom
- And save the file with your preferred name in your preferred folder
#21 Convert to Black and White Image
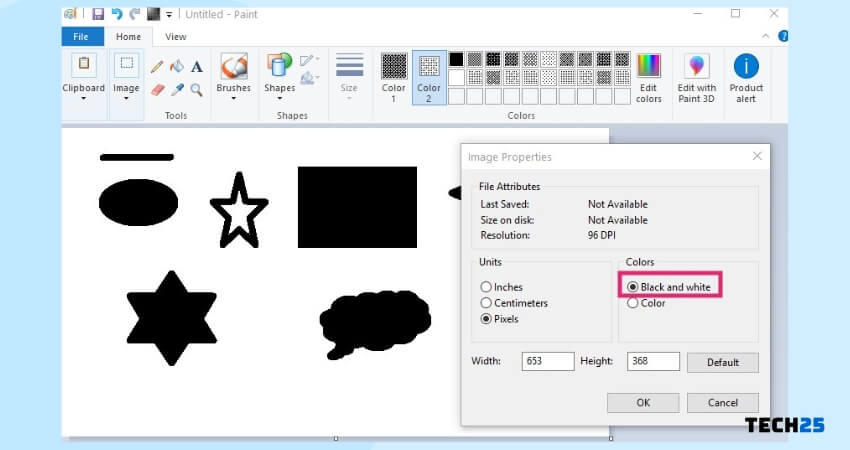
It is a fun trick. You can convert any color images to black and white using MS Paint. Here’s how…
- After editing or drawing on the image in MS Paint, navigate to the ‘File>Properties’ option. In doing so, a new popup window will appear
- Select the ‘Black and White’ from under the ‘Colors’ tab and click on the ‘OK’ button
- Now, a warning notification will appear saying it cannot be undone. Nevertheless, click on ‘OK’ and the image will turn to ‘black and white’
#22 Use the Color Picker
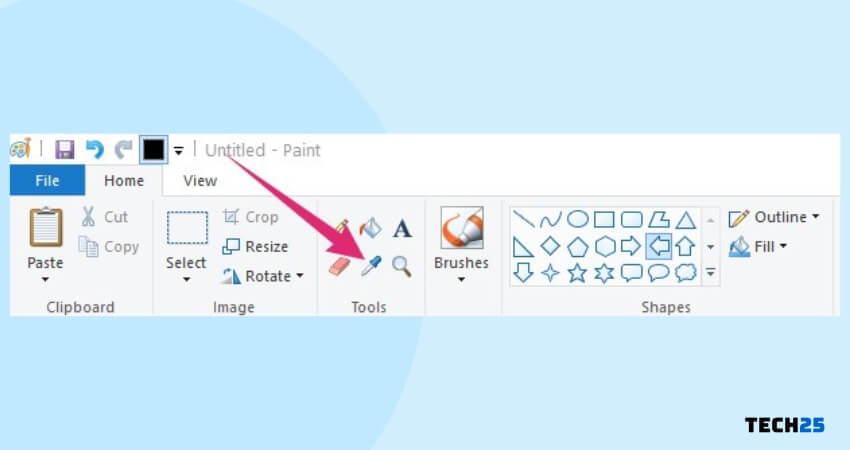
The ‘Colors’ section on MS Paint might have all the colors you want to use on an image. Sometimes, you might want to use a color that is already on the image you are editing. In this case, you can use the ‘Color Picker’ tool.
Simply, click on the ‘Color Picker’ (looks like an eyedropper) tool from the top and click on anywhere on the image to pick the exact color. Now, you can start to draw using that color selected as the ‘Color 1’.
#23 Use the Fill with Color Tool
If you want to fill an area with a particular color quickly, you can use the ‘Fill with Color’ (looks like a bucket) tool from the top menu bar. First off, select the ‘Color 1’ and ‘Color 2’ of your choice. Then, click and select the ‘Fill with Color’ option and use the left-click to draw using the ‘Color 1’ and right-click to draw using the ‘Color 2’.
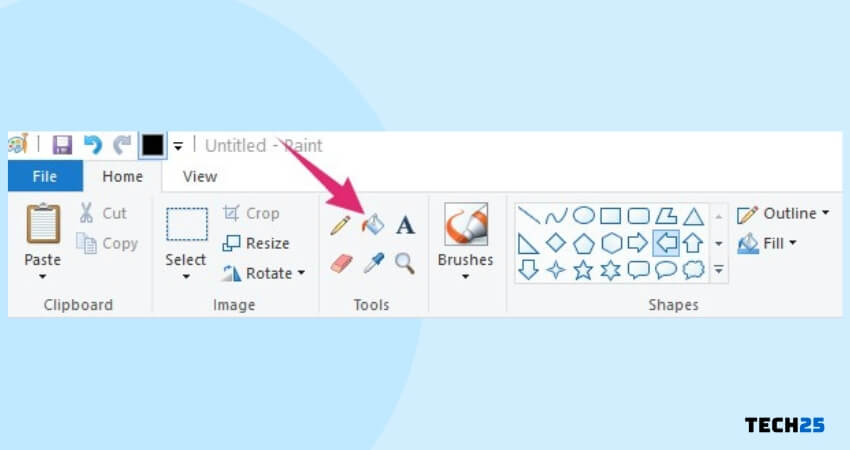
#24 Add Texts to Your Image

You can easily add texts to any image using MS Paint to annotate. Here’s how…
- Open the image you want to add the text on MS Paint
- Next, click on the ‘Text’ (looks like an ‘A’) tool from the top menu bar
- Now, select the area on the image where you want to insert the text using the mouse cursor
- You can drag to make the text box bigger or smaller. Also, you can drag and drop the text box to change the location of the text box on the image
#25 Customize the Texts
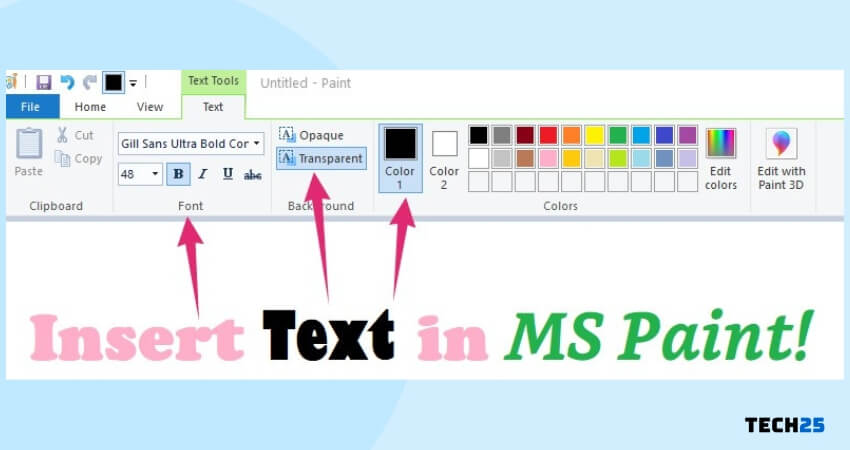
Apart from adding texts to an image, you can also customize the texts to your liking. Here are a few tips on customizing the text on MS Paint.
- You can change the font and the font size from the ‘Font’ tab
- You can also format the text to Bold, Italic, Underline, and Strikethrough
- Additionally, you can also change the background of the text. You can either keep the background transparent or you can change it to ‘Opaque’
- At the same time, you can change the text and background color as well. Here, ‘Color 1’ is the text color and the ‘Color 2’ is the background-color
Summing up Cool Things to Do with Microsoft Paint
That’s it! You are now familiar with our cool things to do on Microsoft Paint. Generally, people tend to think of MS Paint as a normal drawing app that lacks in features and functions.
However, we have shown that it is not that case exactly. Rather, if you are creative enough, you can use MS Paint to a greater extent.
And, chances are for editing an image fast, you will not need an advanced image editing software at all if you know how to take advantage of the MS Paint.
If you are using Windows 10, you might not find MS Paint pre-installed on your OS. In that case, you can install it manually on your PC. Just, search the web to find the files and instructions to do that.
We hope this post was helpful to you. Thus, you can give a read a post of ours on facts about the Internet. And don’t forget to share this with others.