Do you want to know how to change volume on Skype? Then keep reading the rest of this post and learn how to work the Skype volume control and more.
Skype is one of the most popular communications apps in the world. It has its good and bad.
Some people like it, while others don’t. However, if you are using Skype to call, then you might be confused about how to change the volume level on Skype. If that is the case for you.
Then don’t worry at all. Because in this post, we will be explaining several methods of adjusting the volume on Skype in a step by step manner.
By the time, you have read this post, you will be able to change the volume level of both the speaker and microphone on Skype. And, it will be applicable for both audio and video calls.
So, if you are ready, then let’s cut to the chase…
Tutorial on How to Change Volume on Skype
Method #1 Change Volume on Skype Windows Version
There are a couple of ways to change the volume on Skype if you are using the Windows version. The first method we are going to show is tweaking the ‘Audio & Video’ settings from inside the Skype app. And here it is…
Steps to Follow
- Launch the Skype app on your Windows PC
- Next, log in to your Skype account using the login credentials if it doesn’t do that automatically
- Now, click on the ‘3 horizontal dots’ icon from next to the profile name of yours

- In doing so, it will bring out an overlay menu. Simply, click on the ‘Settings’ option from the menu

- Next up, a new window will appear. From there, click on the ‘Audio & Video’ option from the left sidebar
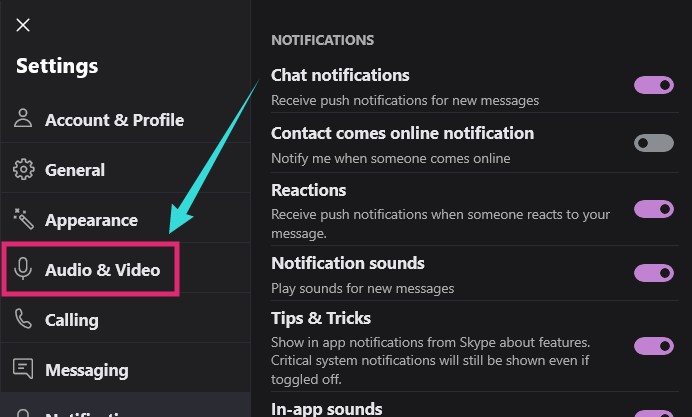
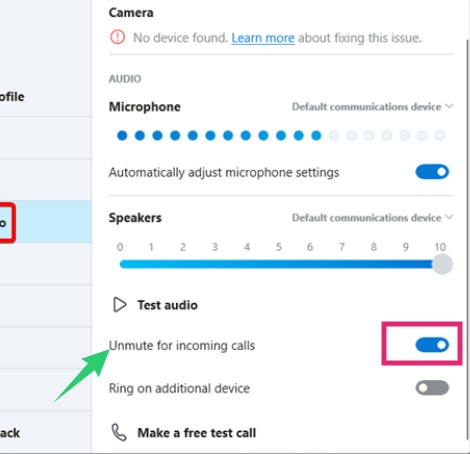
- Now, on the main panel of the options, you will see 3 sections that are related to ‘Camera’, ‘Microphone’, and ‘Speakers’
- By default, Skype automatically adjust the microphone settings depending on the environment and microphone you are using
- But, if you want to change the volume manually, you should toggle off the ‘Automatically adjust microphone settings’ option
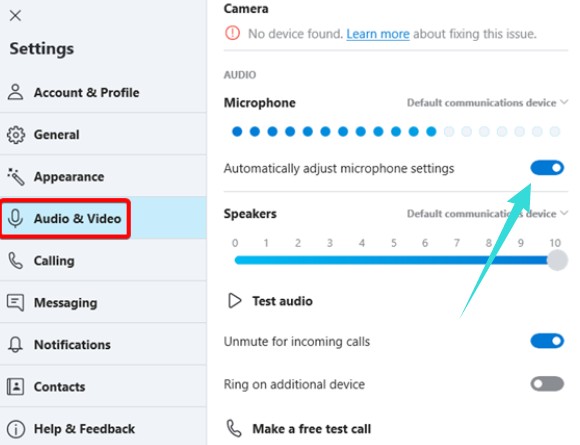
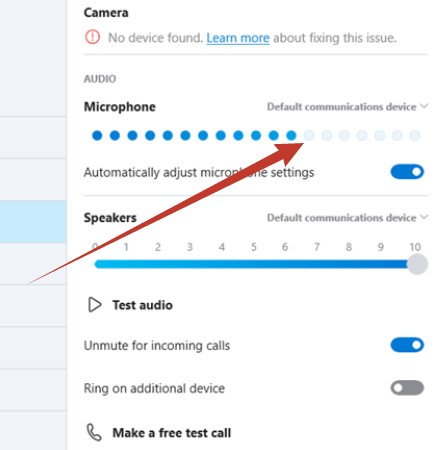
- Now, you can customize or change the volume of your microphone on Skype using the slider under the ‘Microphone’ option
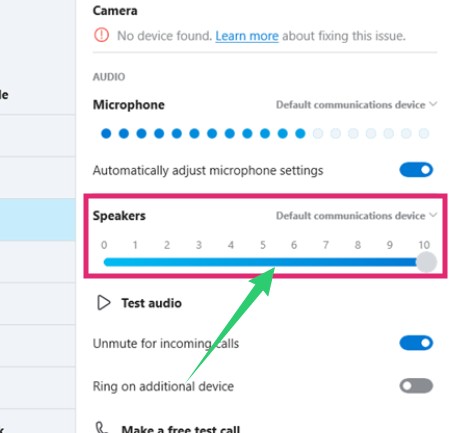
- Then you can also change the volume of your speaker. To do that, simply use the slider under the ‘Speakers’ option from the window
- At this moment, you can click on the ‘Test Audio’ option to check whether the volume level is suitable for you
- You can also turn on or off the ‘Unmute for incoming calls’ option
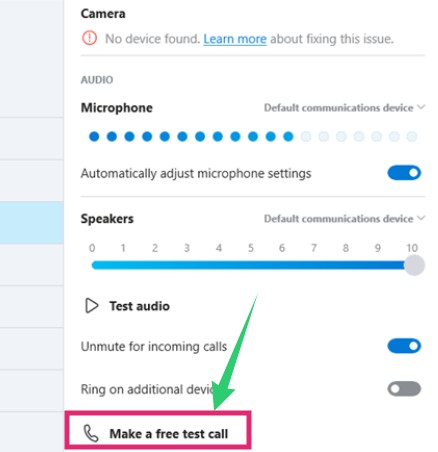
- Lastly, to check if everything is working properly, you can click on the ‘Make a free test call’ option
- As always, don’t forget to save the new settings
This way, you can try different settings or various levels of volume. And, when you find the perfect level, you can settle with that.
Interestingly, using this set of options, you can customize your Skype experience to a greater extent. Here is a quick rundown of all the options under the ‘Audio & Video’ settings.
- Camera: If you have multiple cameras. You can choose the one you prefer the most using this option
- Camera Preview: With this option, you will be able to see how the camera that is currently selected looks
- Webcam Settings: If you want to customize various settings related to your webcam like the contrast, brightness, and so forth, this is the option to check out. Remember, this option is only available in the Mac, Linux, and Windows version of Skype

- Microphone: Like the ‘Camera’ option above, you can change the currently selected mic if you have multiple ones using this option
- Speakers: Similarly, you can select another speaker system, if you have multiple ones connected to your PC
- Speaker Volume: This option will come in handy if you want to change the volume of your speaker. Interestingly, this setting also customizes the volume level of both Skype call and Skype ringtone
- Unmute for Incoming Calls: With this, you can select whether the incoming calls will be muted or not
Now that you know how all these settings work, let’s learn another method of changing the volume of Skype.
Method #2 Change Volume on Skype PC While on a Call
If you want to change the volume while you are in the middle of a call, then you should follow this method. Remember, this method will only work on the Skype Windows, Mac, or Linux version. That means if you are using the Skype Web or iOS/Android app of Skype, you can skip this method.

Then again, it might not work on your version of Skype as Microsoft releases updates to the app on a regular basis. Anyways, let’s learn the method in a step by step manner.
Steps to Follow
- As usual launch the Skype app on your PC
- Then initiate a call to someone you want to talk to. Or else, you can try this if someone has called you on Skype. That means this method will only work if you are on the call
- So, while on the call, click on the ‘5 vertical bars’ from the screen. It is also known as the ‘Call Quality Information’, or ‘Network Quality’ icon. So, click on it
- If you don’t find the icon, simply move the mouse across the screen for a moment to the bottom part of the screen. And the icon will appear automatically
- After clicking on the ‘Call Quality Info’ icon, click on the ‘Speaker’ option from there
- Now, you can click and drag the volume slider which appeared on the screen. If you slide it towards the right, the volume will increase and doing so in the left will bring the volume down
This is how you adjust the volume on Skype in PC while you are in the middle of a call.
Method #3 Change Volume on Skype Mobile App
Unfortunately, the Skype mobile app doesn’t have any such settings specifically to customize the audio settings. Yet, there is a way to change the volume on the Skype mobile app. And, it is one of the easiest things to do.

Simply, when you are in the call, use the physical volume buttons on your smartphone to change the volume level in the Skype mobile app.
Also, the mobile app doesn’t come with the option to choose your preferred speaker or microphone, or headphone.
It automatically detects the audio device while you are on a call. You can try to make a test call to see which speaker or headphone the Skype app on your phone is using (if you are connected to multiple audio devices wirelessly).
Additional Notes:
Above all, don’t forget to check whether the main volume setting on your PC is turned up or not. Make sure the volume is not on mute. Also, try to ensure that in the ‘Volume Mixer’ settings, the volume of the Skype app is all the way up.
The volume level of the Skype app will only appear in the ‘Volume Mixer’ settings if there is audio playing from the Skype app on your PC.
Wrap Up
So, there you have it. Here, we have described multiple procedures of changing volume level on Skype. In the article above, we have also talked about various audio and video related settings that are available on Skype.
If you have followed the methods and steps above, we believe you will be able to adjust the volume level on any version of the Skype app Microsoft puts out there. If this post was helpful to you, you can share it with others.
If you want to know more about the tech giant Microsoft, you can read our post on facts about Microsoft. As always, you can share your thoughts and suggestions in the comment section down below!
