Need help getting out of outline mode in Illustrator? Keep reading
Quick Solution
- Press Ctrl/Command + Y to get out of outline mode
- You can also go to View in the menu and click Preview
Adobe Illustrator or simply known as Illustrator is one of the most popular graphics designing software in the world.
It has a ton of features. And you can create amazing digital artwork with this software. The only problem with Adobe Illustrator is that it could be a bit complex for the users with all of its complicated features and options.
Many users have complained that they have seen that all of their artwork has turned to black and white all of a sudden.
Also, after that, they could not do any type of editing. If you are facing this issue as well, then you are actually in the outline mode. So, you will need to disable that mode first.
In this tutorial, we will show you how to undo outline mode in Adobe Illustrator. So let’s dive right in…
How to Undo Outline in Illustrator – Full guide
The Outline mode is actually a preview mode. So once this mode is activated you will not be able to edit the content anymore. In that case, you need to get out of that mode initially.
Now, lucky for you, there are a number of methods to undo outline preview in Adobe Illustrator.
You can use any of these methods depending on the operating system you are using. Here we go then.
Method #1 Using Keyboard Shortcut
The easiest method to undo Outline preview is to use a keyboard combo shortcut. That way you can undo outline mode within a few seconds. This shortcut is for both Windows and Mac users.
For Windows Users

- Launch the Adobe Illustrator on your Windows PC if you haven’t already
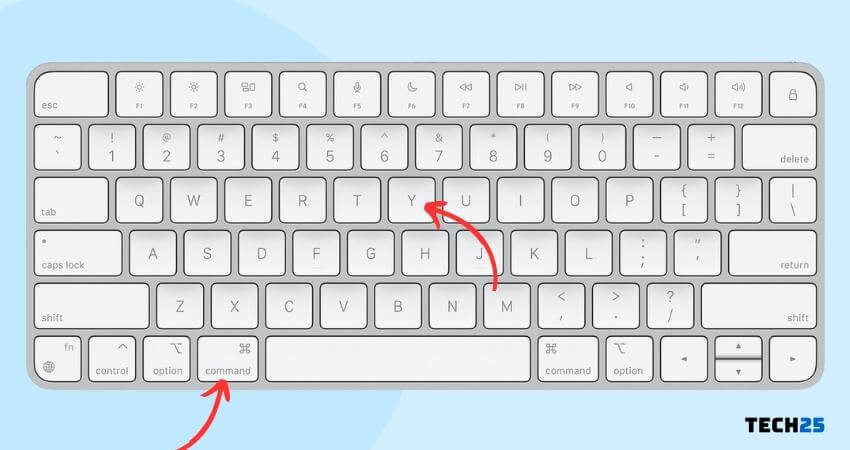
- Then, once you are in the Outline mode, you can press the CTRL+Y keys on the keyboard at the same time
- Instantly, you will see that you are out of Outline Preview mode
- Similarly, you can press the CTRL+Y keys on the keyboard at the same time again to enable Outline mode
For Mac Users
- First, launch Adobe Illustrator on your laptop if you haven’t already
- Then, when you are in the Outline mode, you can press the COMMAND+Y keys on the keyboard simultaneously
- Instantly, you will see that you are out of Outline Preview mode
- Similarly, you can press the COMMAND+Y keys on the keyboard again simultaneously to enable the Outline mode
Method #2 Using the Top Menu Bar
If you don’t like shortcut combos, then you can easily turn on or off the Outline mode with a click of your mouse. Here’s how to do that...
For Windows and Mac Users
- As usual, you should open the project that has the Outline mode issue on Adobe Illustrator if you haven’t already
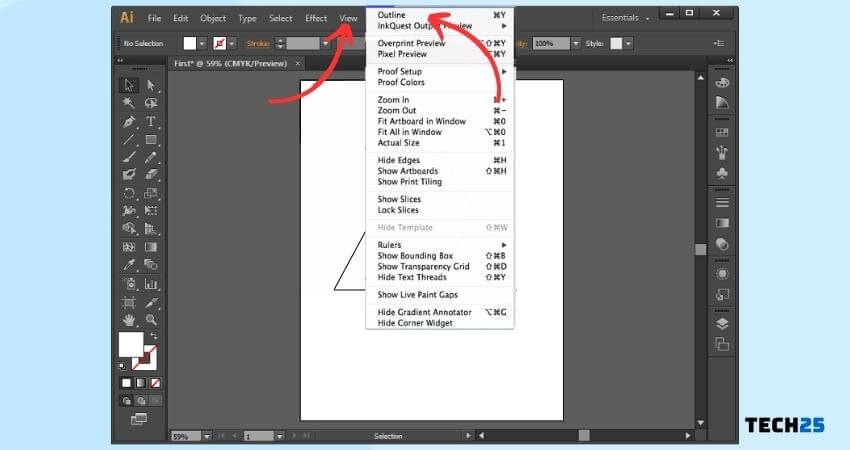
- Next, you have to click on the ‘View’ option from the top menu bar
- In doing so, a drop-down menu will appear on the screen with a few options
- From that dropdown menu, you will need to click on the ‘Outline’ option
- Now, the Outline mode will be activated
Similarly, you can disable the outline mode as well. To do that…
- First click on the ‘View’ option from the top menu bar
- Next, you need to click on the ‘Preview’ or ‘GPU Preview’ or ‘Preview from CPU’ option
- This way, you will see that the outline mode has been deactivated and you are seeing the real preview of the project
Method #3 Using Layers
If you have followed the methods described above, then the entire project will be turned into outline mode. However, you might want to see the outline preview for each layer separately.
Lucky for you, it is also possible to see outline preview for different layers. Here’s how…
For Windows and Mac Users
- At first, you need to open the project that has the outline mode issue on Adobe Illustrator
- Next, press and hold the CTRL key (for Windows) or COMMAND key (for mac) and click on the ‘Eye’ icon on the layer you want to select
- You can do the same thing for all different layers as long as you want it. So the trick is to click on the layer’s ‘eye’ icon while pressing the CTRL/COMMAND key on your keyboard
Method #4 See the Outline and Normal Preview at the Same Time
By following the methods above, you can enable or disable the outline mode in Adobe Illustrator. However, what if you want to see both the outline and preview of the project at the same time? Here’s how.
The tip is to use the ‘Navigator’ option. If you enable the navigator, then you will see a real-time preview of the project on a pop-up window over the min window of Illustrator.
You can also close that window anytime you want to. Here’s how to enable the navigator option.
Steps to Follow
- First of all, click on the ‘Window’ option from the top menu bar
- In doing so, a new dropdown menu will appear on the screen
- From that drop-down menu, you need to click on the ‘Navigator‘ option
- After that, you will see the Navigator window will appear over the main window
- You can move, resize, and close the navigator window as you would do with any other windows
Remember, once you have enabled the navigator option, then you will need to enable the Outline mode as well.
That way, in the main window you will see the outline mode preview. And in the navigator window, you will see the real preview of the project.
What is Outline Mode in Adobe Illustrator anyway
The outline mode is a feature of Adobe Illustrator which shows your digital artwork as simple vector paths. Typically, you would not need this feature mostly.
However, if you have accidentally pressed the CTRL/COMMAND+Y keys on your keyboard, you might have enabled it.
After that, you will see random outlines and no styles or colors available on your project. In this situation, you will not be able to apply any strokes or brushes to it. So, you might have got confused about this problem.
And you don’t know what to do in this situation. Interestingly, it is nothing to worry about. Because you are actually in the Outline mode.
Just disable it by following the method described above. And you will be able to return to the default mode.
Why The Outline Mode is Useful in Adobe Illustrator
Initially, you might think that the Outline mode is unnecessary. However, this mode can come in handy if you want to see overlapping shapes and objects clearly in an image.
That way, you will be able to edit all the lines and shapes perfectly even if you have a lot of overlapping lines on a project.
Final Lines
As you can see the Outline mode actually has a purpose. However, you might not need to use this mode all the time. As a result, we have shown you several ways on how to undo outline Adobe Illustrator.
In addition, we have also shared the method of seeing the outline and normal preview mode at the same time. Plus, we have also tried to shed some light on the ‘Outline’ mode on Adobe Illustrator.
So we hope this post was useful to you. From now on, if you see that only lines and shapes are available on your project suddenly, then you know what to do. Simply, disable the outline mode and get back to normal preview mode, and you will be fine.
If you are having issues with the perspective grid in Adobe Illustrator, you can read our post on ‘How to Undo Perspective Grid in Illustrator?’.
Additionally, if you have found this post useful, you can share this with others. And, if you have any suggestions or queries, you can let us know by commenting down below!