In this post, we will share multiple ways to screenshot on a Toshiba tablet. Whether you need to capture an important email, or a funny pic, screenshots are a daily action most people make.
Screenshooting on Toshiba Laptops
Using the built in features:
To be honest, most laptops today that run Windows come with built in features to take screenshots, and the Toshiba laptops are no different.
Here’s how to capture a snapshot on a Toshiba laptop:
1. To take a full screen shot
- Press the Print Screen ( Sometimes labeled as PrtScn or just Prt ) on the Keyboard. This will immediately capture the entire screen and save it to your clipboard.
- Open any image editing software like Paint or Photoshop and hit Ctrl+V on the keyboard to paste your screenshot. Now you can save it as an image file.
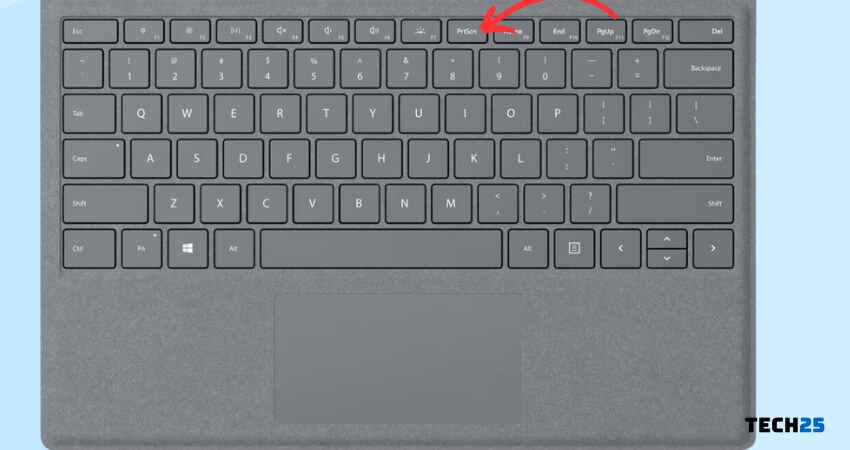
NOTE – Some laptop models have different keys on the keyboard. If you don’t have the Print Screen button or it doesn’t work, just try Fn + End/PrtSc to see if it works.
There’s another, quicker way to save screenshots on your Toshiba laptop if you don’t want to wait or edit it. Just follow these simple steps:
- Open the screen on your laptop that you want to capture
- Press the Print Screen and Windows logo key at the same time
This will take a quick screen capture of your entire screen and save it on your laptop.
2. Want to take a screenshot of part of the screen? Here’s how:
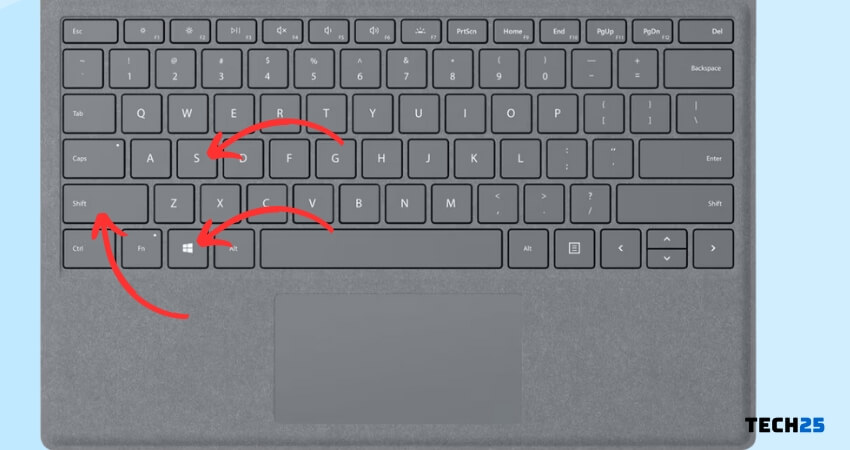
- Press Windows + Shift + S at the same time to open the Snipping tool on your Toshiba laptop. This will let you select a specific area of the screen to capture.
- Now use the cursor to move the selected area on the screen to what you want to capture.
- Release the cursor after highlighting the section you want to save.
- Now open an editing image software and press Ctrl + V to paste the screenshot and save it as an image file.
3. Take screenshot of the active screen only
- Be on the window you want to capture but make sure there is nothing else in the way over it.
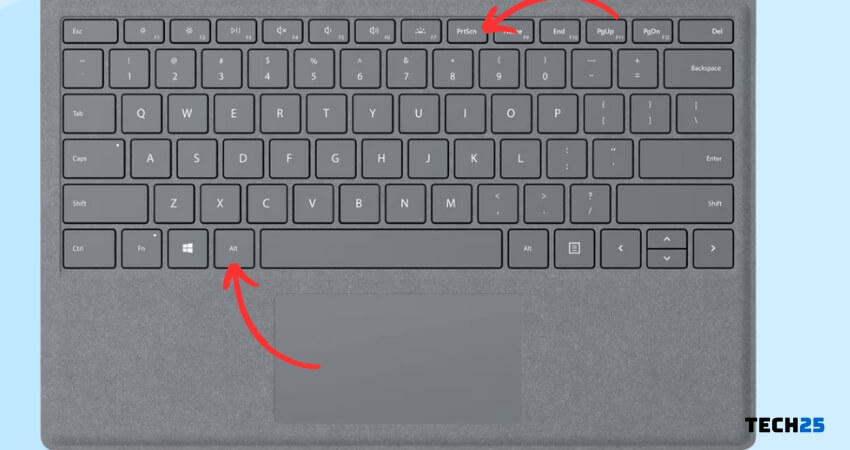
- Press Alt + Print Screen keys together – This will capture the active screen only.
- Open Paint app and press Ctrl + V to paste the screenshot you just saved.
Note – If you want or need to edit the screenshot, just use the Paint software to edit and then click File and Save as to save the file as an image.
How to Screenshot on a Toshiba Tablet
Method #1 How to Take Screenshot on A Toshiba Android Tablet
As with any other android tablets, you can also take screenshots in Toshiba tablets very easily.
Now, depending on the version of android, the method of taking screenshots will vary. However, we will try to cover this broad topic in this situation.
Using the Default Screenshot Function
Many Android tablets already have a screenshot function by default. Now, based upon the model of the tablet, the method of using that feature might vary.
For example, on some android devices, you can swipe your 3 fingers over the screen from top to bottom to take a screenshot.
Also, the screenshot button might be available in the notification bar. If you pull down the notification bar from the top of the screen, you will find that there are a lot of shortcut keys available.
Among them, one of the buttons should be ‘Screenshot’. So, navigate to the screen or page you want to take the screenshot of.
Then pull down the notification bar from the top of the screen and tap on the ‘Screenshot’ button from there. Now, the screenshot will be saved in the ‘Gallery’ folder. You can edit or share it from there.
Using the Physical Button Combination
Up until now, we have shared a couple of methods of taking screenshots in a Toshiba android tablet.
But all of those were software specific. So, in this section, we will show you how to screenshot using the physical buttons on your tablet.
Once again, there is a wide range of Toshiba tablets out there. So depending on the model, the process and the button combination would vary.
For instance, on some tablets, you will be able to take a screenshot by pressing the ‘Home’ and ‘Volume +’ buttons at the same time.
On the other hand, you can take a screenshot by pressing the ‘Home’and ‘Volume -‘ buttons simultaneously.
Matter of fact, on some tablets, there is no Home button. In that case, you will have to use the ‘Power’ button combination.
So, press the ‘Power’ button and ‘Volume Up/Down’ button at the same time and the screenshot will be saved in the gallery or photos app.
Remember to press and hold the buttons for a few seconds to work the method successfully.
How to Take Screenshot on A Toshiba Windows Tablet
We have just shown how to take a screenshot on android Toshiba tablets. Now, we will be sharing how to do this on Windows Toshiba tablets. Once again, you can use button combinations.
In this case, you have to press and hold the ‘Windows’ icon/button and at the same time, press and hold the ‘Volume Up/Down’ button.
You will see that the screen has dimmed for a second. For some particular models, you might find a notification saying that a screenshot was taken successfully.
Also, if the previous method doesn’t work on your tablet, you can try to press the Power and Volume Up/Down buttons at the same time. In many tablets, this specific button combination also works to take screenshots.
To be noted, here we are telling you to press the ‘Volume Up/down’ button. This means depending on the model, you either have to press the Volume Up or the Volume Down button.
How to Take Screenshot on A Toshiba Tablet Using 3rd Party Software
Now that you know how to take screenshots on a Toshiba tablet using shortcut keys or button combination.
But in this section, we will reveal information on how to take screenshots on your tablet using 3rd party software.
There are a lot of screenshot taking software or app are available for both Android and Windows tablets. So, let’s talk about them…
For Windows
There are many 3rd party screenshot utilities available for Windows OS. But not all of them are feature-rich or easy to use.
Thus, we would recommend 2 apps in this case those are Greenshot and Lightshot.
You can download either of these apps and install them on your Toshiba Windows tablet. Then follow the instructions on the apps to take the screenshot.
For Android
The Android app market is huge. So, there are hundreds of screenshot taking app available. So, here we will be sharing links to a few reliable screenshot apps on Android.
You can install them on your Android Toshiba tablets and then follow the instructions to take the screenshots as you like.
Some popular apps for taking screenshots in Android:
How to Take Screenshots in Windows Tablet Using Keyboard Shortcut
If you are using a Windows Toshiba tablet and also using a physical keyboard to type on it, then this method is for you.
Windows operating system has a default screen capturing shortcut keys. In this section, we will talk about some of those. So, here we go.
PrtScn Shortcut #1:
- Go to the page or screen on which you want to take the screenshot. And then press the ‘CTRL + PrtScn’ keys on the keyboard at the same time. In some keyboards, the ‘PrtScn’ key might be named as ‘PS’, or ‘Print’, etc.
- Once you have done that, a copy of the screenshot will be saved on the clipboard. So, you will have to save it immediately
- To do that, open any image editing software like ‘Paint’ or ‘Paint 3D’ on your tablet
- Then, paste the screenshot on Paint. You can use the basic shortcut for pasting like the ‘CTRL + V’ or ‘right-click>Paste’ function
- After you have pasted the picture, you have to save it. But before saving, you can also edit the screenshot if you want to
PrtScn Shortcut #2:
- If you don’t want to go through pasting and saving the screenshot using Paint like software, you can follow this method. In this method, you will be able to take screenshots of the full screen of your tablet and the screenshot will be saved automatically
- Go to the screen or window, you want to take the screenshot. Now, press the ‘Windows + PrtScn’ keys on the keyboard at the same time
- Instantly, you will see that the display dimmed for a second. That means the screenshot was taken successfully
- To find the saved screenshot, you have to go to the ‘Pictures’ library of your windows, and then you will find a folder named ‘Screenshots’ there. Open the folder and you will see all of the screenshots you have taken in this way
PrtScn Shortcut #3:
If you were not successful using the previous methods, then you can try this one.
However, in this case, the keyboard you are using with your Toshiba tablet should have the ‘Fn or Function’ key. Now, using the ‘Fn’ key, you can do multiple things regarding taking screenshots. Let’s see what those are…
Take Screenshot of the Entire Screen (Manual):
To take a screenshot of the full screen, you have to press the ‘Fn + PrtScn’ keys at the same time.
But it will be saved to the clipboard. So, you will have to paste it on other image editing software like ‘Paint’ and then save it.
Take Screenshot of the Entire Screen (Auto):
In this method, you will not have to save it manually. Windows will automatically save the screenshot to the ‘Screenshots’ folder of the ‘Pictures’ library.
Simply, press the ‘Fn + Windows + PrtScn’ keys on the keyboard at the same time. Next, you will find the pictures in the ‘Pictures>Screenshots folder.
Take Screenshot of the Active Window:
If you don’t want to take a screenshot of the entire screen but only the active window, then you can use this method.
Simply, press the ‘Fn + Alt + PrtScn’ keys on your keyboard simultaneously. And the screenshot will be saved in the ‘Pictures>Screenshots folder.
Take Screenshot of the Entire Screen (Alternative):
There are many keyboards for tablets that don’t have the PrtScn key. In that case, you can use this method to take a screenshot.
Simply, press the ‘Fn + Space’ key on your keyboard at the same time. It will save the screenshot on the clipboard. So, you will be able to paste it on any image editing apps and save it.
Take Screenshot of the Active Window (Alternative):
Once again, this method will come in handy, if the keyboard you are using doesn’t have the PrtScn key.
So, take a screenshot of the active window, press the ‘Fn + Alt + Spacebar’ keys simultaneously. And, the screenshot will be saved in the ‘Pictures>Screenshots folder.
Wrap Up
Here, we have discussed how to take screenshots on a Toshiba tablet. In the process, we have tried to share as many methods as possible. Because we don’t know what model of Toshiba tablet you are using.
And depending on the model of the tablet, not all the methods would be suitable. We hope you have found a method that works for your particular Toshiba tablet.
If you want to know how to blur in MS Paint, then you can read our easy-to-follow post on this topic. And don’t forget to let us know which method worked for you in the comments section.